Use the color picker on the design tab when you want to set the color for a piece of text. Use the color picker on the Style tab when you want to set the color for all the text.
When working with emails in DailyStory a common desire is to configure different colors and styles beyond a white background and dark text.
The email designer provides very granular control over foreground and background colors, but it isn't always obvious. We've put together this how to guides to walk through configuring email foreground and background color settings.
The email designer relies on a concept called blocks. Blocks can be stacked. For example, a text block, then an image block and then a button block. However, some blocks can also be containers of other blocks. This concept is fundamental to controlling more advanced foreground and background colors.
ImportantUnderstanding this block relationship is critical to building more complex foreground / background contrasts in your email.
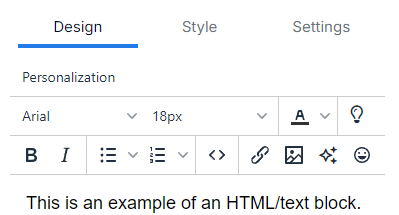
The most common use case that can cause confusion is when working with a Text/HTML block. For example, when using the rich editor there is a drop down to set the color of the font:
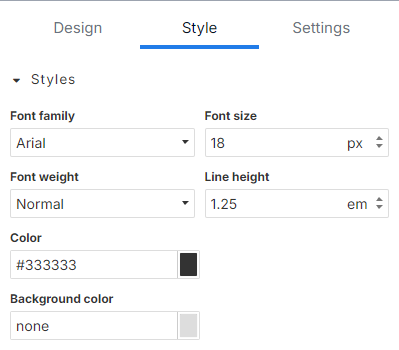
And, on the Style tab for that block there are also options to set the foreground and background colors:
These color options can be confusing. The most obvious choice if you want to change the color is to simply select the text, and use the color picker on the "Design" tab.
However, this only sets the color of the selected text. It does not set the color for all elements. For example, bulleted text.
ImportantUsing the color picker in the Text/HTML Design tab only sets the color for the selected text.
If the goal is to set all of the text to a single color, the color option on the Style tab should be used instead. This options says, "set all the text in this block to this color". Whereas the Design color picker only sets the selected text's color.
A common problem is when you want to have a bulleted list of options. You create the bulleted list, set the text color from the Design tab, but when your email is rendered the bullets are a different color than the text.
The solution is to set the color in the Style tab. The color option in the Design tab doesn't need to be changed.
The purpose of the two options is confusing at first, but makes sense as soon as you understand why there are two options.
For example, you have some text in your email. You have a base color of black, but you want to color some text red. This is accomplished by selecting the text and using the color picker in the designer.

The best strategy for working with emails that use background colors other than white is to either set the background color of the email container or add Column Block containers.
The recommended approach is to use Column Block containers. Drag them on to the email designer, set the background color, then drag other elements (buttons, text, etc.) into the Column Block container.
Using a column block container with a background color allows all other elements to maintain a transparent background.
For example, here is a One Column Content block container with an orange background. Next, we dragged a Text/HTML block onto that container and set the color on the Style tab to white:

Besides colors, the benefit of the block containers is that you can set padding for the entire container vs. setting padding for each individual element.
Below are some frequently asked questions about working with colors in your email.
Use the color picker on the design tab when you want to set the color for a piece of text. Use the color picker on the Style tab when you want to set the color for all the text.
Use the color picker on the style tab when you want to set the color for all the text.
Use the Style tab to set the color. This will set the color for the text and other elements, such as the bullets.