New? Start Here
Navigation Tour
Step 1: Finish Setting Up Your Account
Step 2: Bring in your contacts
Step 3: Create Customer Lists
Step 4: Set up Email Marketing
Step 5: Set up SMS Marketing
Step 6: Send your first campaign
Your DailyStory Settings
Company Settings
Personal Settings
Personal Settings
Report Subscriptions
Changing Your Password
Personal Settings Frequently Asked Questions
Account Setup
Setting up Email Marketing
Setting up Text Message Marketing
Integrating With Your Website
Using Subscriber Topics
Install DailyStory WordPress Plugin
Install DailyStory Beacon in SquareSpace
Install DailyStory Beacon in WiX
Beacon Frequently Asked Questions
Licensing and Usage
Choosing your Plan
Understanding Plan Usage
Free Plan (Freemium) Account Verification
Free Plan (Freemium) Limitations
Upgrading Your Subscription
Purchase Managed Services
Canceling your DailyStory Service
Credit Card Declined
Advanced Settings
Customer Support
Build Popular Campaigns
Work with Contacts
Managing contacts
Contacts Guide
Editing contact records
Adding contacts manually using the Create Contact option
Importing contacts
Adding contacts using automation
Exporting contacts
Arranging order of custom contact record fields
Deleting Contacts
Merge duplicate contacts
Making Contacts Inactive
Creating Contact Lists
DailyStory Segments Guide
Viewing the Contacts in a Segment
Disabling and Enabling Segments
Deleting and Restoring Deleted Segments
Archiving and Restoring Archived Segments
FAQs: Segments
Add Contacts to a Static Segment
Building Exclude Segments
Create a Static Segment
Create a Dynamic Segment
Advanced Contact Searches
Using direct free text search
Using advanced search
Changing order of custom contact search fields
Filtering your search
Common searches used for segments
Managing custom contact fields
Accessing the custom contact fields
Creating custom contact fields
Sample custom field configuration
Enabling a custom field in search
Editing and arranging custom contact fields
Managing tags
FAQs: Contacts
Test Lead
Work with Campaigns
DailyStory Campaigns Guide
Creating a campaign
Managing a Campaign
Add Contacts to a Campaign
Editing a campaign
Pausing or Unpausing a campaign
Deleting a campaign
Removing a Campaign from Archived Status
Cloning a campaign
FAQs: Campaigns
Archiving a Campaign
Inbound Marketing Tools
Landing Pages
Landing Page Guide
Creating or Editing a Landing Page
Using the Page Designer
Adding a Form to a Landing Page
Editing a Landing Page's HTML and CSS
Landing Page Frequently Asked Questions
Popups
Creating Popups
Creating a Popup Using a Canva Image
Configuring a Popup's Basic Settings
Configuring a Popup's Display Options
Configuring a Popup's Layout Options
Popup Frequently Asked Questions
QR Codes
Tracking Links
URL Shorteners Guide
Create or Edit a URL Shortener
Test a URL Shortener
URL Shortener Advanced Options
URL Shortener Metrics and Reporting
Measure click performance and track link conversions
URL Shorteners Frequently Asked Questions
Web Forms
Web Forms Guide
Setting up or Editing a Web Form
Design a Web Form
Styling your Web Form
Publishing your Web Form
Web Forms Frequently Asked Questions
Cloning a web form
Google Ads Conversion Tracking
Magic Forms
Outbound Marketing Tools
Email Marketing
Email Designer Widgets
Text / HTML widget
Image widget
Video widget
Social Icons widget
Event widget
RSS widget
Personalization widget
Countdown Timer widget
Driving Directions widget
Weather Forecast widget
Header widget
Two Column Container
Footer widget
Email Marketing Guide
Create an Email from a Template
Using the Email Designer
Create or Edit an Email
Preview an Email
Send a Test Email
Manage Senders
Sending and Scheduling Emails
Mocking a forwarded or replied to email
Scheduling an Email
Send an Email to a Single Contact
Built-in Email Guardrails
Create an Email Template
Edit an Email Template
Manage Email Revisions
Email Designer Advanced Topics
Email Merge Tags
Edit Email HTML, CSS and AMP
Import and Export Emails
Email Technical Details
Troubleshoot Email Delivery
Bounced Email Guide
Send AMP Emails
Email Frequently Asked Questions
Email Designer Frequently Asked Questions
Cloning an email
Configuring SPF, DKIM and DMARC
Editing HTML in the Email Designer
Transactional Email Guide
Resending an Email
Managing auto-reply emails
SMS Marketing
Send a Text Message Quick Start
DailyStory SMS Marketing Guide
Creating or Editing a Text Message
Sending and Scheduling Text Messages
Sending a Test Text Message
Text Message Replies Report
Understanding Text Messaging Costs
Text Message Sending Guardrails
Text Message Deliverability Recommendations
Sending Individual Text Messages
Replies to Text Messages
Understanding Text Message Delivery Codes
Setting up Keywords for Text Message Replies
Opting out of Text Messages
Text Message Frequently Asked Questions
Copying a Text Message
Purchase Text Message Credits
SMS Links with Restricted Content
Opting into Text Messages
10DLC Registration
Cloning a text message
Randomized or Batched Sending
Text Message Conversations
Custom SMS URL Shortener
A/B Testing
Personalization
Personalization Guide
Built in Personalization Tokens
Custom Personalization Tokens
Using Conditional Logic with Personalization
Personalization Frequently Asked Questions
Push Notifications
Web Push Notifications
Using Integrations
Automation
Content Managment
CMS
CRM
Ecommerce
Flowhub Integration
Instamojo Integration
BigCommerce Integration
Konnektive Integration
Lightspeed Integration
Magento Integration
Shopify Integration
Weave Integration
WooCommerce Integration
Square Integration
Stripe Integration
Graphics
Point of Sale
Productivity
Reviews
Text Messaging
Utlity
Zapier
Zapier Integration
GoToWebinar integration using Zapier
Save SMS Replies to Google Sheets using Zapier
DailyStory app for Slack
Calendly Integration
Google Analytics Integration
Google reCAPTCHA Integration
Zoom Integration
Google Lead Form Ads
Verification
Integration Guide
Using Automation
Automation Guide
Design an Automation
Automation Triggers
Automation Actions
Automation Conditions
Automations Dashboard
Exporting and Importing Automations
Automation Frequently Asked Questions
Reporting Tools
Reports and Dashboards Guide
Dashboards
Sent Emails Report
Sent Text Messages Report
Push Notifications Report
Web Activity Report
URL Shortener Report
Popups Report
Who is Visiting Report
Paid Search Summary Report
Email OptOut Report
FAQs: Reports
Other Tools
File Manager
File Manager Guide
Manage files and folders in File Manager
File Manager Frequently Asked Questions
File Manager Picker
Tasks
ChatGPT Writing Assistant
Campaign Calendar
Retargeting Pixel
Help & Support
Table of Contents
- All Categories
- Outbound Marketing Tools
- SMS Marketing
- Setting up Keywords for Text Message Replies
Setting up Keywords for Text Message Replies
Updated by Rob Howard
Guide to keywords
What is a keyword
A "keyword" is a simple word or phrase that a customer can text to your marketing number and receive an automated response. Think: short, trackable, memorable, simple. Keywords are usually 4-7 characters and do not include special characters like emoji's or symbols.
Account Settings > SMS Messages
and pick any number you have purchased.Why use a keyword
- Make it easier for customers and prospects to opt-in to your SMS marketing campaigns.
- Use a keyword response to trigger an automated workflow.
Promoting relevant keywords on various marketing channels can attract more opt-ins and grow your SMS subscriber list. Keywords enable you to segment your SMS subscribers based on their interests, preferences, and location.
Keyword examples
Keywords should be 4-7 characters, and easy to remember.
- Terms, like "FREE"
- Your business name like "DAILYSTORY"
- Actions you want customers to take, like "SHOP", "RUN", and "BUY".
Keywords you should not use
Opt-out default words: Our system will send an auto-response of "You are opted out of text messages from <your account name inserted>. Reply START if you ever want to opt back in." and the contact will be opted out of future messages.
- "STOP"
- "OPT OUT"
- "QUIT"
Help default words: Our system will send an auto-response of "Messages from <your account name> and <your website> have been reported. Reply STOP if you ever want to opt-out."
- "HELP"
Opt-in default words: Our system will send an auto-response of "👍 You are opted in to text messages from <your account name>. Reply STOP if you ever want to opt out."
- "JOIN"
- "START"
- "OPT IN"
- "SUBSCRIBE"
How to create a keyword
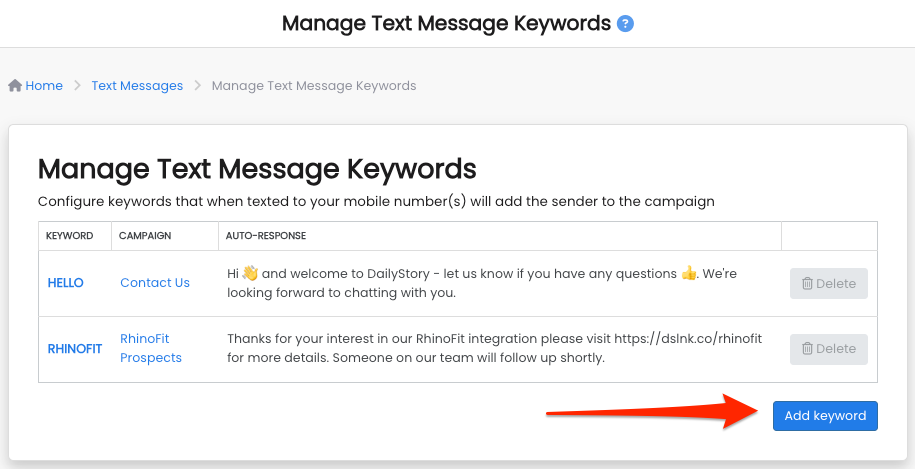
- Navigate to
Outbound > Manage Keywords.
- Click
Add Keyword
from the Manage Text Message Keywords page.
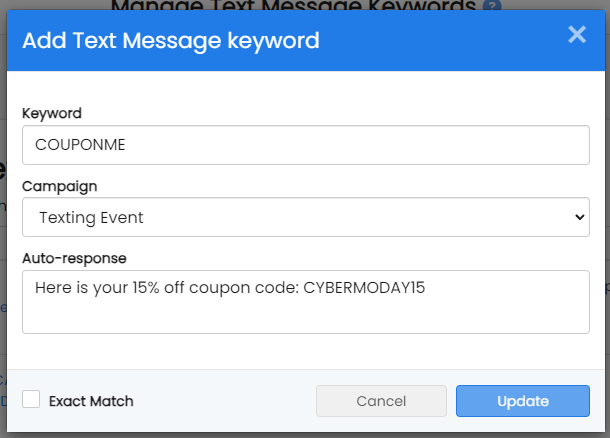
- From the next window, you have 4 steps to complete.
- Type your
keyword
. (Note: the keyword does not have to be upper case.) - Select the
campaign
to associate it. - Type the
auto-response
message you would like sent back when the keyword is received. - Optionally set if the reply should be an exact match (see FAQ below).
- Type your
- Click the
Add
button in the bottom right. Both the incoming text and the auto-response count toward your text message credits.
What happens when the keyword is received
- The auto-response is sent back to the contact.
- The contact is added to the specified campaign.
- The contact is logged as opted-in to receive text messages.
Using a keyword in an automation
In addition to creating a dedicated keyword and auto-response, you can alternatively look for keywords using an automation step.
For example, you've texted the customer and asked them to reply "1" to be added to a welcome campaign. When "1" is detected in the reply, your automation will send a follow-up text message that says:👍 Welcome! We'll send you coupons and offers on upcoming specials. Reply STOP if you ever want to opt-out.
Here are the steps to achieve the above example:
1. Create a campaign. You can name it Welcome Campaign Keyword as an example.
2. Add a text message to the campaign that contains the keyword you are asking for them to respond with (in our example above this was "1").
3. Add a second text message to the campaign that contains the reply once the keyword is received. (in our example above this was the message that started with the thumbs-up emoji and then Welcome...).
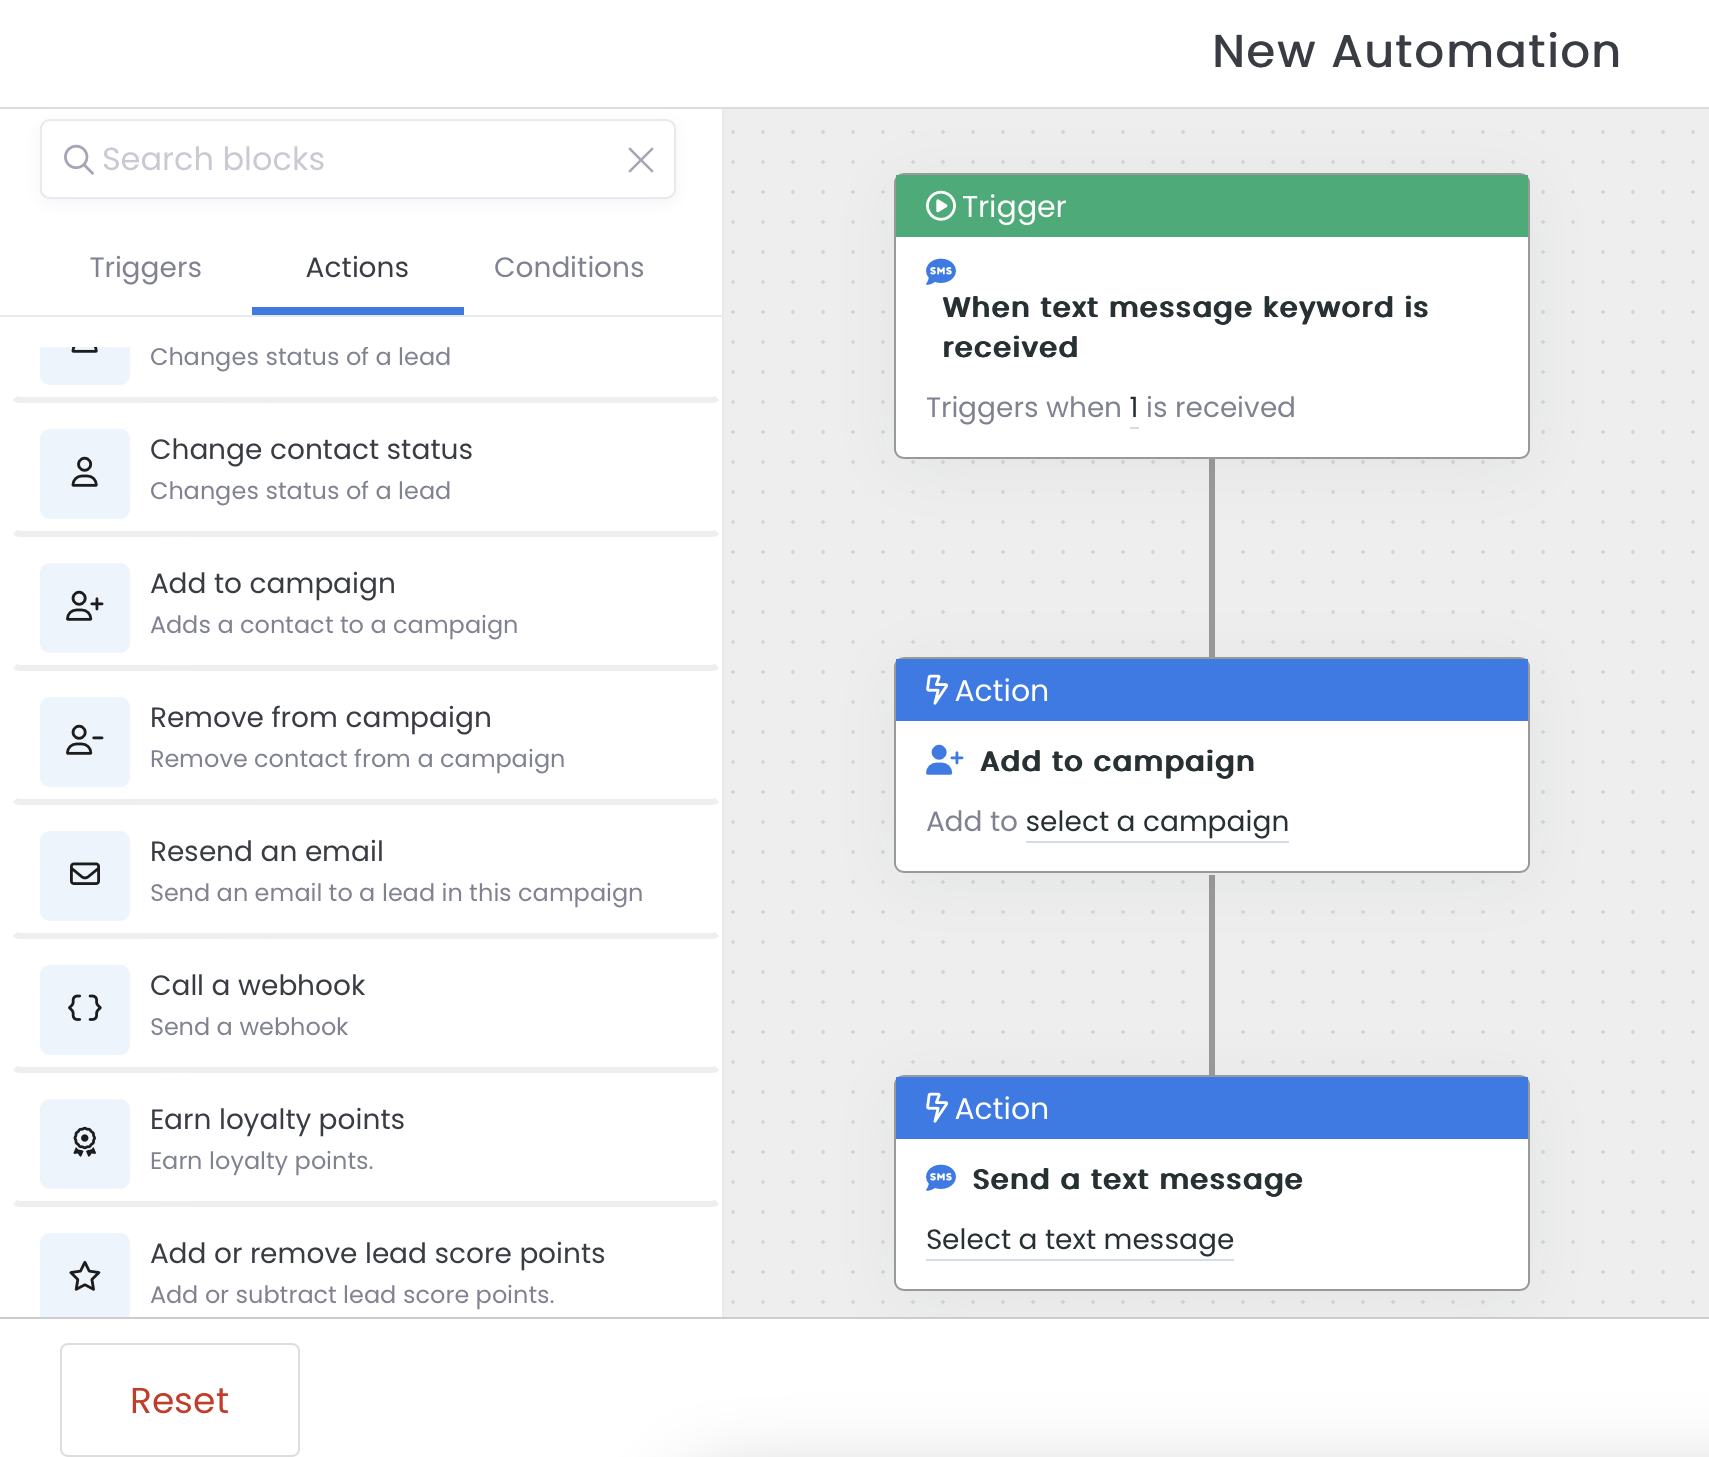
4. Add an automation to the campaign. Use the following steps in the automation:
- Trigger: When a text message keyword is received (insert the keyword you chose - our example as "1").
- Action: Send Text Message -> Select the text message from the list.
- Action: Add to a Campaign -> Choose the campaign
Frequently Asked Questions
Below are some frequently asked questions about keywords.
What is an exact match?
By default a keyword will not be an exact match. This is to ensure that if a keyword is used in a reply, it can be found anywhere in the reply.
For example, the keyword "DISCOUNT15". When an exact match is disabled, "I'd like DISCOUNT15" would still be considered a match of the keyword. However, when an exact match is enabled, "I'd like DISCOUNT15" would not be an exact match.
Does uppercase of the keyword matter?
Keywords are often written in all caps. For example, DISCOUNT15. However, discount15 or Discount15 would both be considered matches for the keyword.