Push Notification Guide
Use DailyStory Push Notifications to send personalized and targeted messages to an iOS or Android app.
RecommendedNote: to use DailyStory to send app push notifications you need to use the DailyStory REST API to register the device from your mobile app.
Push Notifications are useful for sending specific messages to people directly on their phone through an existing iOS or Android app.
Similar to Email Marketing and Text Message Marketing, you can use push notifications to send targeted and personalized communication to people using your app.
This can include:
- Thank you messages
- Reminders
- Important notices
- Offers and discounts
DailyStory's Push Notifications support personalization and are sent individually to each contact. This is different from other broadcast Push Notification services which send the same message to all recipients.
Push Notifications are sent to contacts that opted in to receive push notifications on their iOS or Android device. Push Notification messages are only available to iOS and Android App(s). And, your iOS or Android App must also register the device id with DailyStory.
DailyStory Push Notifications require Twilio integration. Twilio Notify Service integration must be configured. DailyStory can manage and configure this service for you, or you can do it yourself.
This guide provides a list of resources to help you get started with Push Notifications.
Create a Push Notification
- Navigate to
Outbound > Push Notifications. - Next, in the main Push Navigation menu click
+ Create. This will open the Push Notification editor. - From the editor, select an exisitng campaign for your Push Notification or create a new campaign.
- Select a Title and the Message content for the Push Notification. As you type your title and content you'll see a preview of what your Push Notification will look like.
 Recommended
Recommended title and message length vary between devices. However, in general, a Push Notification should be as short as possible.
Within the title and message of your Push Notification you can also use Personalization tokens and conditions to target the content to each recipient or fill in your recipient's first name, as an example.
- Finally, click on
Save & Close.
Once the Push Notification is saved, you can also schedule when and to whom the Push Notification is sent to. The Push Notification is also now available to add to a campaign's automation.
Edit a Push Notification
- Navigate to
Outbound > Push Notificationsand click on the Push Notification you want to edit.
- This will open the Edit Push Notification screen, which is nearly identical to the screen where you created your notfication. From here, make any edits or revisions and click
Save & Close.
If you edit the content of a scheduled Push Notification, the scheduled Push Notification will use your new content.
Test a Push Notification
- Click the
Send Testbutton in the Push Notification editor. - Search for and select a Contact that you wish to send the Push Notification to. If the Contact has a device registered for Push Notifications and has not opted out, the test message will be sent to the Contact's devices.
Sending a test Push Notification will only send the Push Notification message to the specified contact.
Send a Push Notification
Similar to other features such as Email and Text Messages, Push Notifications are sent through the scheduler or through an automation.
Send using the scheduler
- Navigate to the push notification to schedule and then click on the
Schedulebutton - Choose the segment(s) to send to and the date and time to send.
- Click
Save & Close.
Send dates and times are based on the time zone configured for your account.
Send using an automation
- To send a push notification using a campaign's automation, navigate to the campaign where the push notification is located and click on the Automations tab.
- Click on
+ New Automation. - Select
Create a new automation. - Choose your Trigger first and drag it onto the canvas. For this example, we chose When added to the campaign as the trigger.
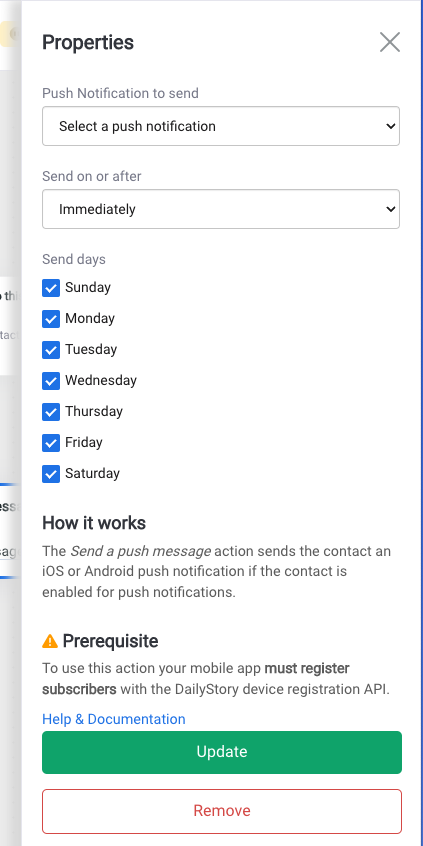
- Next, from the Actions tab drag Send a push notification onto the canvas underneath the above action step. You will see a blue dot when it's safe to drop it on the canvas.
- From the Properties menu, select the push notification you want to send and then click the
Updatebutton.
- Click
Saveand give the automation a name and optional description. - Click the back arrow
<--to return to the automation settings and enable the automation. Just flip the switch toONto enable the automation.
Frequently Asked Questions
Below are frequently asked questions about Push Notifications:
Is everyone sent the same Push Notification?
No. Each Push Notification sent by DailyStory is send individually to each recipient. This is done so each message can be personalized to each recipient.
Can I personalize the content in the Push Notification?
Yes! Using DailyStory's Personalization tokens and conditions you can add personalized content to your Push Notifications similar to emails and text messages.
Why didn't my contact receive a Push Notification?
Unlike email and text messages, Push Notifications do not provided delivery information.
There may be several reasons why a recipient did not receive your Push Notification:
- The recipient may not have been included in the segment the Push Notification was sent to;
- The recipient may not have opted-in to receive Push Notifications;
- The recipient may have disabled Push Notifications;
- The app isn't properly registering the device id with DailyStory;
- Or Twilio Notify Service integration is not properly configured.
Can one contact have multiple devices?
Yes! If your App is installed on multiple devices, such as an iPhone and and iPad, each of the device ids are registered with DailyStory. When a Push Message is sent, the message is sent to all the devices registered for the Contact.
How do I enable DailyStory to send Push Notification to my App?
Enabling DailyStory to send Push Notifications to your App requires registering the device id. This provides DailyStory with a unique identifier (the device id) that identifies the App and the individual. Secondly, Push Notifications are sent by DailyStory using Twilio. Twilio Notify Service integration must be configured. DailyStory can manage and configure this service for you, or you can do it yourself.
Why can't I see delivery information?
Push Notification messages do not provide delivery information. Unlike email and text messages, if you want to know if your recipient receives your Push Notification additional updates to your App are required to tell DailyStory when a message is received.
What is a Device Binding?
A device binding is a unique identifier that uniquely identifies your app and the devices the app is installed on. When an App is installed on the device and the end user agrees to receive notifications, a device binding is created. This device binding, or device id, is then sent to DailyStory. When DailyStory sends a Push Notification the device id is used to identify the recipient.
Can I start an automation when a device is registered?
Yes! Create a new Autopilot automation in a campaign and use the When device is registered trigger. This trigger is called whenever a device is registered. It will first check to see if the contact associated with the device is in the campaign (and add them if not) and then run the next step in the automation.